Photorealistic Depth of Field in CGI
Create Bokeh in your 3D Render Engine
Blauw Films

Creating Realistic Bokeh in CGI
You can achieve lots of Subtle Realism in CGI by using our Freely Available custom aperture maps!
This way we can replicate camera techniques through through visual effects, creating Bokeh.

For those new to this phenomenon, bokeh is an element ever-present in life.
Whether you look through a camera lens with crafted optics, or through your own eyes...
There is always bokeh.
For the longest time, I've been trying to achieve a higher level of photorealism in my work.
The look and feel of the depth of field is one of those areas that became a personal obsession.
The Importance of Realistic Bokeh
Working on a tutorial for creating bokeh in cgi allowed me to experiment a lot with aperture maps :)
It is important to find a workflow for yourself in which you can focus on what matters to your visual arts.
Creating a photographic look and feel to my 3d renders has always been important to me.
I'm always experimenting with camera and lighting techniques to achieve more cinematic "computer generated images".

In my long process of Research & Development to improve my work as a 3d artist this was one area I’d often overlooked.
To make it fun for myself — and learn something on the way —
I wanted to solve a personal challenge: How to match our eyes’ bokeh?
.png)
The Human Eye and the Camera
The aperture map below is my first attempt at creating an Eye bokeh texture map.
I made this texture in Photoshop by combining diverse eye-surgery photographs.
Extracting the right color values was a bit tricky but I’m happy with how it turned out.
When I defocus my vision I see a pretty similar bokeh shape.

If you want to achieve a stronger difference between highlights and shadows in your Depth-of-Field, you can increase the contrast of your aperture map texture.
But for most photorealistic renders I recommend using a subtle contrast ratio.

It is important to use real camera techniques and cinematic lighting techniques together to achieve the best result.
And if you have too strong of a contrast in your aperture map, you can create distracting artifacts in your blur.

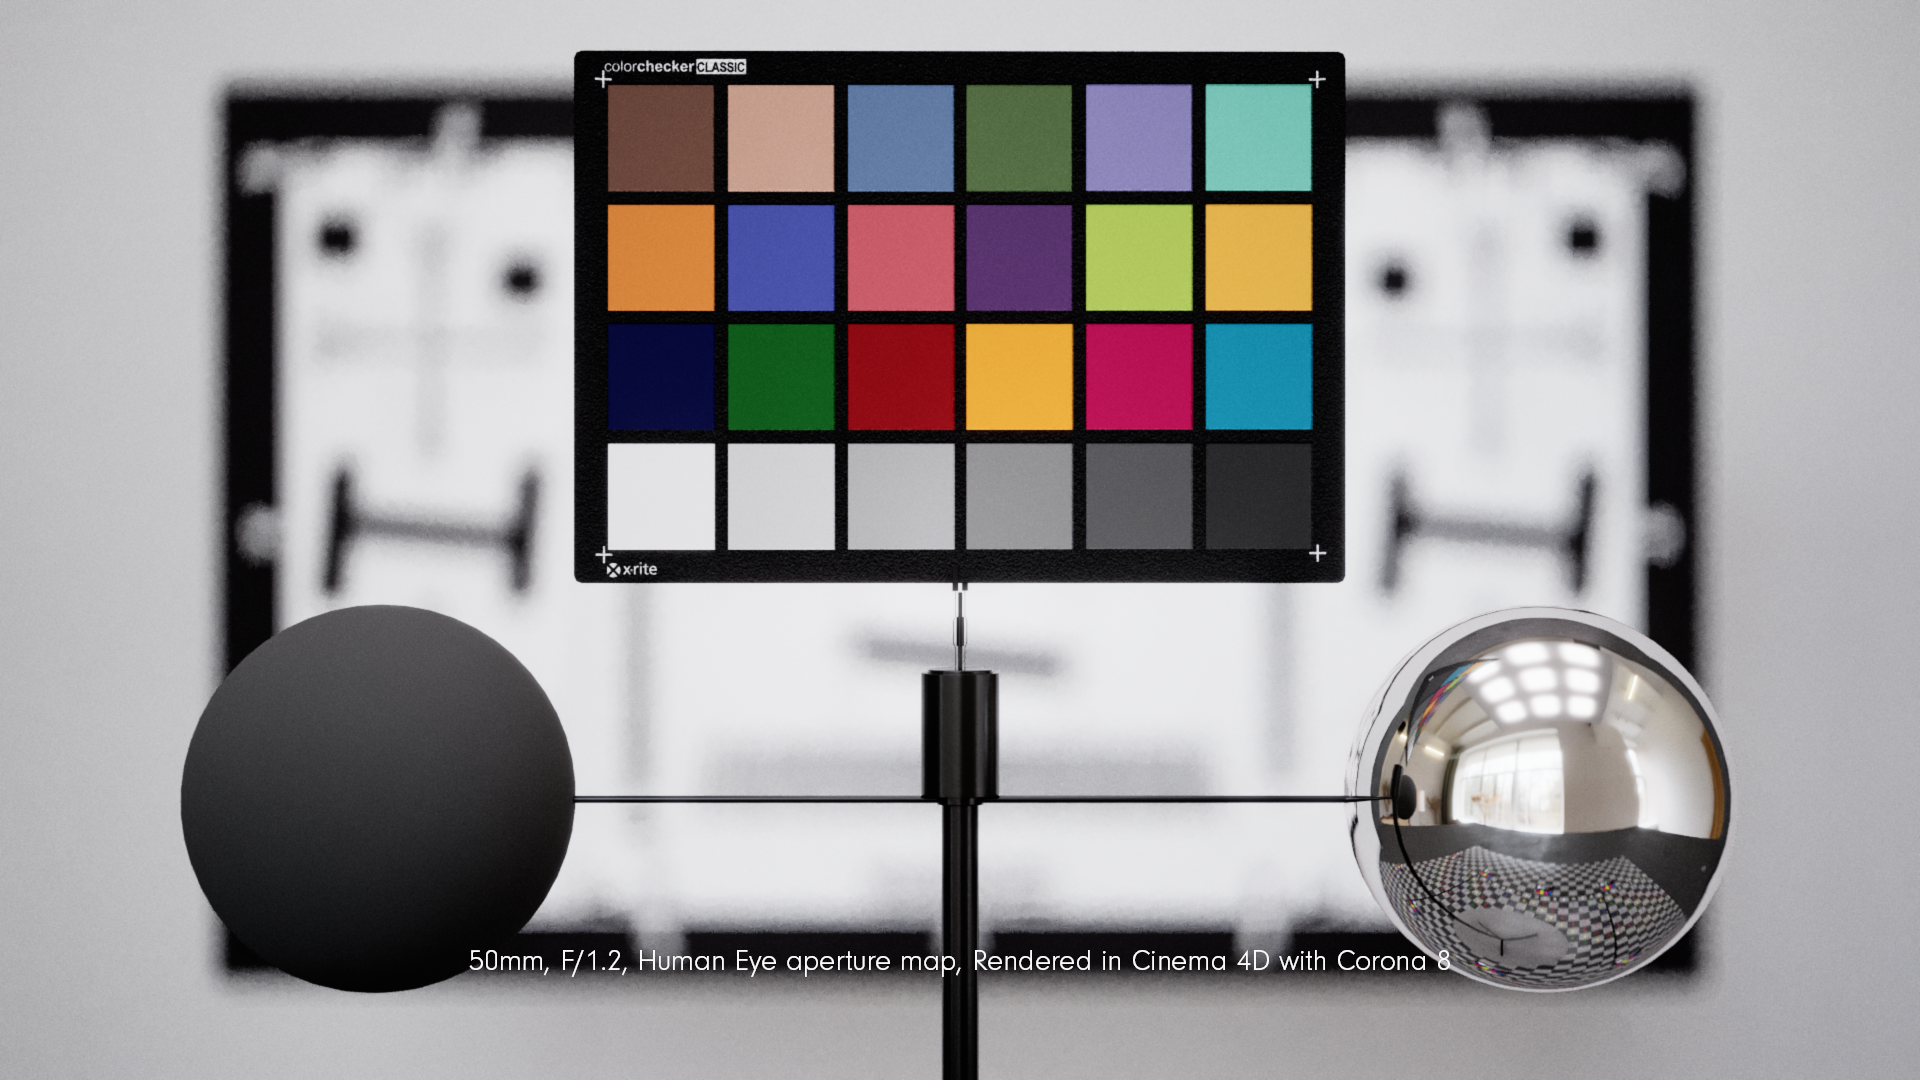
The human eye aperture map generates organic 3d renders with lots of camera imperfections.
But that might not be what you are looking for.
A traditional camera lens is made of diverse crafted optics such as the front elements, the aperture, the lens groups and the rear element.
Each lens is different. And so is each lens' bokeh.
Alright, here are some tests with a Heptagonal over-compensated aperture:

Notice the subtle changes in the intensity of the Depth-of-Field relative to the F-Stop of the lens:


With a closed down aperture, such as in the example above, you can see there is barely any contrast between what is in-focus and what is out-of-focus.

Production Ready Aperture Maps
The cinematic quality of your 3d-render is based on the interplay between all factors.
From camera setup to lighting techniques, and even something as subtle as the feel of your blur.
The more you open your aperture, such as F/1.2, the more the effects become extremely obvious.
In the above examples you could see the subtle effects of the bokeh, even on a Wide Depth of Field like F/16.
But it's important to consider what aperture shape you want to use in your render.
A heptagonal aperture geometrically "splits" the out of focus area into overlapping heptagons.
The same is true for any aperture shape, together with any level of light compensation.
It all has an effect on how your blurry areas look.

Both of these examples are with low chromatic aberration.
I will soon be rendering tests with higher levels of aberrations, as well as different aperture imperfection maps.
For those with experience of camera lenses and optics you will be familiar with the following chart:

Lenses (both organic and crafted) come in a variety of shapes (aperture shape).
But the light distribution within that shape can vary lots from lens to lens.
A 13-sided aperture can be
- under-compensated (light collects in the center, giving soft edges)
- balanced (slightly sharp outlines, evenly lit blur disk)
- over-compensated (light collects to the sides, creating halo bokeh)
That's pretty much it about lenses for now.
More Blogs on Bokeh
If you're interested in achieving Photo-realism in your renders, this blog on the effect of Bokeh on Photo-realism goes into greater depth. And if you want to go even more in-depth! There is the following blog on understanding lens aberrations in 3D.


Conclusion
Achieving a photorealistic 3D-render is a fine balance of creativity and technical skill. Bokeh is a relatively fun and easy place to start to increase the photorealism of your 3D-renders. No matter what your preference is for how you want your renders to feel, there is always an aperture map that will best suit your depth of field.
I'd love to see what you make with the Bokeh Builder! So feel free to contact us with your art or tag us on Instagram :)
Reading List
References
- What is Bokeh? — Wikipedia
- Discussion on common misinformation around Bokeh — DP Review
- Does the human eye's field of view change based on light or dark? — Quora
- Eye Aberrations — Telescope Optics
- Corona Camera Settings in 3Ds Max — Chaos Docs
- Corona Camera Settings in Cinema 4D — Chaos Docs
- Corona VFB in 3Ds Max — Chaos Docs
- Corona VFB in Cinema 4D — Chaos Docs




.jpg)








%20by%20Ivan%20Aivazovsky.jpg)




0 Comments